
Document Placeholders
— When publishing, document placeholders are flagged as errors, but the publish completes successfully. This is expected behavior. Leaf Elements
— Some publishing attributes in leaf elements may accept or require multiple values. Delimit multiple values for publishing attributes with commas.
— Leaf elements that are to be created in the same output folder cannot have the same output file name. If two leaf elements have the same output file name and are in different folders that have the same output folder locations, the publish log reports duplicate folder/file paths.
— The Output File attribute must have a value. The file name must include the appropriate extension (for example, outputfile.pdf). The submission cannot be published without a file name.
— The Output File attribute must include the correct extension. For example, when you choose Yes for the Use Native File attribute to publish a Word document and you enter outputfile.pdf for the Output Filename attribute, you cannot open the file with Acrobat. You can change the file name extension to .docx to open it in Word.
— If you choose Yes for the Use Native File attribute for a leaf element containing two or more non-PDF documents, a message warns you that Ennov InSight cannot concatenate non-PDF documents.
— If a leaf element contains multiple documents and one but not all the documents are encrypted or password protected, the output for the leaf comprises only the non-encrypted documents. The encrypted documents are overwritten by the non-encrypted documents.
— When a leaf element contains multiple encrypted documents, the final output comprises the last encrypted document in the leaf definition.
— The output file on a leaf must contain content. Otherwise, the following error will occur: unable to calculate attribute checksum for leaf...exception detected...access denied.
— If a volume break resides on the leaf you are deleting, you should move the volume break to the closest folder. Volume breaks that reside on a deleted leaf will not be published.
General Publish Considerations
Publishing helps you with your details in a formatted document. However, you must have file format for your document to be published.
When publishing from Ennov InSight , you should consider the following: — PDF File format
— Document Structure
— Major and Minor Divisions
— Page Scaling and Overlays
PDF File Format
Ennov InSight publishes to PDF version 1.4 by default, which is compatible with Acrobat version 5 and later. This can be changed on an assembly-by-assembly basis within the Publishing Settings.
It is useful to understand Acrobat, the way PDF files are created and used, and the Adobe Acrobat products. You can find information about Acrobat at the Adobe Web site.
Note: In certain cases, links created with Acrobat 8 or 9 will not resolve to the correct file if viewed with an earlier version of Acrobat (7 or previous). This is due to changes to the Adobe Acrobat PDF version that are not backwards compatible.
Document Structure
A composite document, or document roll-up is an ordered list of files comprised of multiple subdocuments, each maintained in their own right. Ennov InSight is specifically designed to compile and publish these documents as single, seamless entities that are a complete package ready for printing, distributing or saving as separate documents. You can publish electronically, retaining the original structure of the document list. You can also define a complete folder hierarchy for this, which is independent of the original document locations.
The composite document can be thought of as having three key parts:
— The cover page comprises previously prepared sheets that are usually placed at the front of the document, for example, title and copyright information. Cover pages can be added anywhere in an assembly.
— The table of contents (TOC) is prepared from a TOC definition template that defines the layout of the TOC pages, and is compiled from a combination of assembly elements and document extracts or bookmarks held in the constituent documents. The TOC may have up to 20 levels and has no limit on the number of entries. All TOC entries can be automatically numbered. Ennov InSight can also automatically enter the page numbers and a series of roughly fifty page-counting variables associated with TOC entries. Several TOCs can appear in a single publication, each with its own scope of pages. Tables of equations, figures and tables can also be defined separately.
— The document, sometimes called body matter, comprises constituent documents or specified page ranges from within constituent documents. Documents may be in any format supported by rendering, but must be in a repository Ennov InSight can access. The resulting output is a new document, eCTD XML structure, set of volumes for printing, or set of electronic files in a folder hierarchy defined as part of the publish process. Page ranges are useful for dividing a single document into multiple pieces, and for omitting or replacing pages in a source document that do not apply. In the case of dividing a single document into multiple parts, all links between pages are maintained during publishing. When copying placeholders between assemblies, these page ranges are maintained. A complex document may consist of several volumes, each with its own TOC and with an overall master TOC. Any page in the output document can be overlaid by a previously designed overlay template. This provides for the addition to the document of custom headers and footers, watermarks and other information. Different templates can be applied to the cover page, TOC and individual major divisions, minor divisions, volumes, folders, leafs elements, documents, and pages.
Keep in mind that any document that has security or requires a password will fail to render, and may cause a long delay as rendering attempts to complete.
Warning: While you can create documents that are children of other documents within the assembly, this is for viewing only and may cause issues during publish. To roll up documents under a leaf, simply include all documents in the proper order as children of the leaf.
Major and Minor Divisions
Any folder in the assembly can be set as a major or minor division. These divisions can represent modules, sections, items, parts, chapters, and other standard subdivisions of a publication, depending on the type that is published.
These divisions are used for page counting and to support variables such as major division name and minor division number.
There are three major and minor division variables available to access the Name, Abbreviated Name, and Number of the previous folder of each division type:
| Division name | Major division variable | Minor division variable |
| Name | $MNAME | $NNAME |
| Abbreviated Name | $MABBR | $NABBR |
| Number | $MN | $NN |
— Name = $MNAME
— Abbreviated Name = $MABBR
— Number - $MN
These major division variables ($MNAME, $MABBR, $MN) resolve the corresponding attribute of the previous folder in the tree marked as a major division. The minor division variables, $NNAME $NABBR, $NN, resolve the corresponding attribute of the previous folder in the tree marked as a minor division. Major and minor divisions do not follow parent/child hierarchy, the previous major or minor division is the next one encountered in bottom-to-top order in the navigation tree. A major division also ends the current minor division. You can control the major and minor divisions on the folder attributes.
Any folder may be set with a major or minor division, but for standard publications the first level folder should be set as a major division, and the second level folder as the minor division, for example items and sections in a legacy electronic submission.
Note: When using Major Division Relative Volume breaking and the default volume file naming format ($VOLNAME), the system will overwrite the volume named V000001.pdf for each major relative division it encounters. When using this scheme, you should either substitute or add an additional variable to the volume name format to prevent overwriting.
For eCTD submissions, the first level folder is set to major division to represent the current module name and number, and each folder containing leaf elements is set to the minor division. In this way, any leaf may refer to the minor division to reference the current eCTD section.
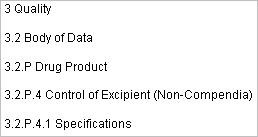
In the following example, for a leaf in the 3 Quality folder, the minor division number $NN will be set to 3.2.P.4.1 and the major division name will always be set to Quality, as shown in this example:
The minor division ($NN) resolves as expected, after the folder is set as minor division, and that number is then used for that element.
Page Size and Overlays
You can customize your electronic output by adding paper effects and setting a common page size.
With appropriate licensing, you can include some paper effects in electronic assemblies. Paper effects that might be appropriate for the electronic output channel include the following: TOCs, overlays and cover pages.
When publishing PDF content, Ennov InSight supports the normalization of final page sizes. The page size is automatically determined based on the output paper type. For example, if the constituent documents comprise both A4 and US sized paper, and the target output is A4, the US pages are scaled to fit. Ennov InSight enables you to scale down a page to a set of standard margins to leave space for additional information you might add, for example, headers and footers.

This enables you to use a single overlay for all page sizes in the publication. The overlay file can only be made smaller, so if you use this option, you must ensure that the overlay is at least as large as the largest page of your publication. For example, a US letter sized overlay applied to an A4 page will not be scaled to account for the longer dimension of the A4 page. Overlay Handling
Selecting the best fit overlay option searches for the closest match in the overlay file on a page-by-page basis. If an exact match is not found, or you do not choose best fit, Ennov InSight rotates an overlay to get an exact or close match for the page. If an exact match is not found with best-fit or rotation or neither has been set, then the closest match is scaled to fit.
— Selecting Best Fit overlays will increase the time to publish due to the extra processing required for matching each page. If the page size is known, this option should be avoided.
— Before publishing to different page sizes with overlays, you must define the appropriate page sizes in your overlays and have best fit enabled. If this is not properly set up in your overlay files, you may get improper stamps; Ennov InSight requires these settings in order to choose the correct overlay to fit the output page.
Publish Links
Intra-document links (links within documents) are treated differently by Ennov InSight than inter-document links (links between documents). These links are read into the Ennov InSight database during extraction but in many cases they should not be rewritten during publish time.
These links are often verified during document finalization and any manipulation of these in the final rendition would require additional quality control of the published output.
For this reason, any internal link set to the System Profile is not rewritten to documents during publishing unless absolutely necessary. The System Profile only writes inter-document links (because the relative paths have all changed) and writes intra-document links in cases where documents are split during publishing.
If you want the intra-document links to be rewritten, you must set all links to publish with a different link profile, one that you have defined in the assembly link settings. For paper cross-references, all links are rewritten during the process of stamping the final cross-reference text on the page.
Cross-References
Cross-references are the paper-publication equivalent of hyperlinks. Since output to paper does not contain hyperlinks, Ennov InSight stamps text in the right margin of the published documents. The text of these page stamps is defined for the link's profile in the link publishing settings.
Note: By default, only inter-documents links are set to the paper output channel for the creation of a cross-reference.
If there are too many cross-references to fit on one page, the stamps extend past the end of the page. You must reduce the number of cross-references so that they can all fit.
To use the cross-reference variables, you must first set up the variable publishing settings. After setting up the variable publishing settings, you can enter the variables enclosed in brackets on the applicable location. See the topic Ennov InSight variables more information about system, Ennov InSight , repository, and user-defined variables.
For cross-references, margin stamps appear in the right margin (regardless of page orientation) starting at the top and are listed sequentially down the page. The link box still exists but does not show in the paper copy output. The link box still works but it does not work outside the current volume. Each cross-reference is tagged with a number at the link box next to the referenced text and next to the margin page stamp.
Margin Stamp
Use the document overlay attributes to adjust the area used by the margin stamp. The document overlay settings control the allowable space used by margin stamps. Setting the Scale contents to margins option to Yes will scale the document to fit the parameters defined by the document overlay settings.
Note: You are not required to set an overlay template file when setting document overlay margins.
Prepare to Publish
Preparing to publish is an optional but recommended step in the publishing process. It is a flexible function that enables you to prepare your assembly for publishing. Following are the publishing ways as follows:
— It ensures that you have all the files, renditions, and extractions that will be necessary for a successful publish.
— It updates data used in queries so you can see predicted issues.
— It refreshes your volume and page count information to ensure that your page number variables resolve correctly.
Note: When using variables for tab text, certain variables cannot be used as they will not resolve: element number, element name, element title. Instead, it is recommended that you use the leaf number, leaf name, minor division number, and minor division name variables to represent the current tab location. If you use minor division variables, be sure to verify that minor divisions have been appropriately assigned to folders in the current assembly, or they will not resolve correctly and may cause previews to fail.
Before you publish a submission, be sure that:
— All required fields are completed.
— All output filenames on leafs are completed.
— Leaf names are unique within an output folder.
— Reference leaf elements point to leaf elements that are not empty.
— eCTD Definition Files are defined in the Publication Settings.
— For paper output, at least one volume was created.
— For paper or electronic output, at least one document is assigned.
Failure to verify any of these items may result in a failed publish.
Run Prepare to Publish
Use the Prepare to Publish option to prepare your assembly for publishing.
To prepare to publish:
- On the action toolbar, choose Prepare to Publish.
- On the Prepare to Publish dialog box, select the options you
want to perform for the publication.
Option Description Publishing Output Channel: Choose Electronic or Paper output. Generate Missing Renditions and Extractions: You must have a license for Ennov InSight rendering and publishing services to generate missing renditions. Remove Empty
Assembly Folders:
This removes any empty folder elements from the assembly. Option Description Remove Empty Assembly Leafs: This removes any leaf elements that have no content from the assembly. It skips reference leaf elements and elements with metadata. Prepare Cross-
Reference Leafs:
This ensures that the checksum is correct and is available when you are publishing any cross-reference leafs that point to content outside of the current sequence. Render Generated TOCs and Special
Sheet Templates:
If TOCs or special sheets are missing, they are created. Generate TOCs: If you have not generated TOCs or if the TOC is outdated, this generates the TOCs. After generation is complete, the TOC is available as a Word document and can be previewed in Ennov InSight . (The text in the right column of a TOC will not resolve for a leaf element that has no document assigned.) Generate Volumes: If you have not inserted or locked volumes, this function recalculates all volumes in the assembly. If there are locked volumes in the assembly, this refreshes the page counts and volume names prior to publishing. Update Volume Page Counts: When selected, this function updates the page count for each volume within an assembly. The number is shown on the Volume View page as a Total Sheets/Pages attribute. It is also shown in brackets on the tooltip that appears on the Volume icon in the assembly. Refresh Publishing Readiness Data: This refreshes the information in the Publishing Readiness Report based on the selected output channel. To see the report, this must be run at least once. Refresh Link Inspector Data: This is required if you want to run the Link Inspector report. This is necessary to create in-process links or perform in-process link retargeting. Refresh Link Inspector View: Choose Current Sequence View Only (refreshes only the current sequence), or Entire Working Assembly (refreshes the current sequence and all previous sequences). - Click OK.
A message indicates that some of the processes may take awhile.
- Click OK.
- Choose Go To > Job Requests to view the log file to check for any errors.
Cancel Prepare to Publish
You can cancel a Prepare to Publish action after the process is started. When canceled, the Prepare to Publish will complete the current phase and then stop, and no other selected Prepare to Publish phases will be run.
Use the following procedure to cancel a Prepare to Publish before it is completed.
To cancel a Prepare to Publish:
- After Prepare to Publish has started, open GO TO > Job Requests.
- On the Job Requests Search page, click Search.
- On the Search Results page, find the row for your Prepare to Publish job in the list and click Cancel Job.
- In the Cancel Job dialog box, click OK to cancel the Prepare to Publish.