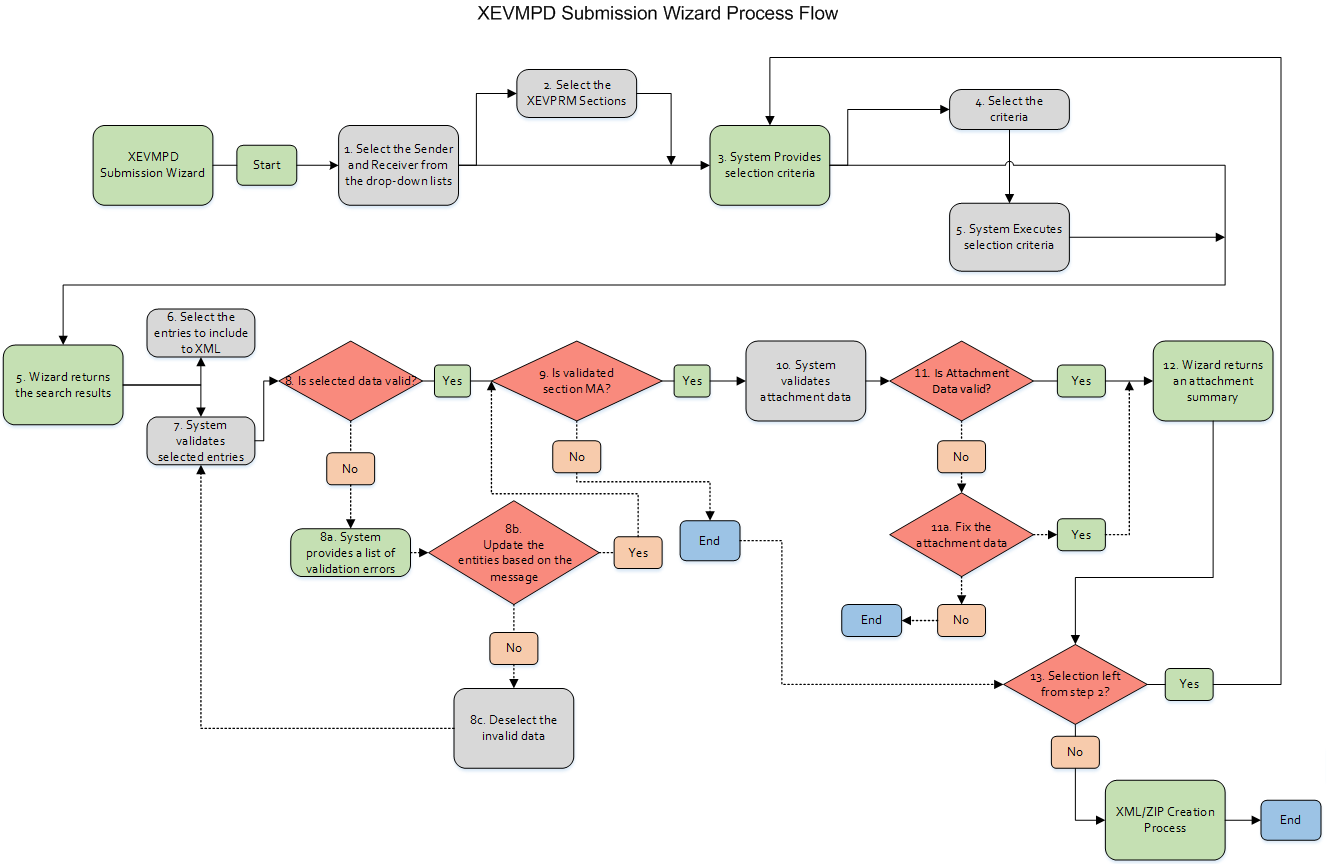
You can use the
XEVMPD Submission Wizard to create the XEVPRM
.zip file for submission to the EMA.
The
XEVMPD Submission wizard can be invoked from the
Calyx RIM
Home Page menu bar or from the
Create a New - XEVMPD Submission section in the
I Am Looking To pane. You can also use
XEVMPD Submission wizard functionality of creating XEVMPD XML file via workflows.
Use the following procedure to create your XEVPRM
.zip file:
-
Choose
(or
Create a New - XEVMPD Submission).
-
On the
Select Sender/Receiver Information page:
-
Select a
Sender (drop-down menu with
Active Message Sender Name Values from Data Administration).
The
Authorised Product section is filtered by Sender value. The value is automatically filled by the system with the
Full Product Presentation entity Message Sender field the first time it is used in the wizard. Values with a blank
Message Sender field, and Marketing Authorisation values with the
Sender field selected in the Full Product Presentation entity, are available when you select the
Authorised Product section.
-
Select a
Receiver (drop down menu with two predefined by system values -
EVTEST and
EVHUMAN).
-
To proceed, click
Next.
-
On the
Select XEVPRM Sections page, select one or more of the available XEVMPD sections:
- Organisation
- Source
- Master File Location
- ATC
- Pharmaceutical Form
- Route of Administration
- Authorised Product
If there are validation errors associated with your selected XEVPRM Sections, the system displays messages describing the errors.
-
To proceed, click
Next.
-
Do the following:
-
Specify search criteria for the selected XEVPRM properties.
Depending on the XEVPRM properties selected, additional filters may appear for defining your search.
-
The wizard guides you through criteria selection according to the XEVPRM properties you selected.
Display Columns is the only required search criteria field for all section properties. All other criteria are optional.
-
To proceed, click
Next.
-
On the
Search Results page:
- Organisation name, Source name, Master File Location Company, ATC Code, Pharmaceutical Form name, Route of Administration name, and Authorisation Number are hyperlinks. You can click on the name and modify the data in the pop-up window.
- The columns can be sorted, refreshed, and exported to Excel.
- You can correct the errors by clicking on the hyperlinked name of the section and correct the fields that resulted in validation errors. After correcting the field, refresh the pop-up window. If there are errors with Attached data for Authorised Product, you need to exit the wizard and fix the data.
-
To proceed, click
Next.
-
On the
Create XEVPRM Confirmation page:
-
Please enter a name: You can accept the system-generated name in this field, or enter a new name for XEVPRM message to be saved.
In the following image,
XEVPRM_20141210085118 is a system-generated name.
Warning: Avoid using special characters in the
name field, such as:
\ or
/ or
&
-
Output location: Specify the location where the message will be saved. Select the document management system or file share from the list and browse to choose the specific location in your system. Select the location, and then click
OK.
Note: The system has an ability to automatically save a file to a predefined location during the server setup, then after selecting
Next button on the
Create XEVPRM Confirmation screen generated Submission XML file will be saved to that location. You can change the location using the
Browse button. If your predefined location is other than File System and you are logging on to a DMS, a pop-up message will prompt you to enter your credentials.
-
To proceed click
Next.
-
On the
Create XEVPRM Summary page:
-
You can see the confirmation that the XEVPRM
.zip file was generated successfully.
-
Click the hyperlink to save the XEVPRM
.zip file to your desktop.
-
After The XEVPRM
.zip file is saved, click
Finish.
You can now submit the XEVPRM
.zip file to EMA.
 Note: The system has an ability to automatically save a file to a predefined location during the server setup, then after selecting Next button on the Create XEVPRM Confirmation screen generated Submission XML file will be saved to that location. You can change the location using the Browse button. If your predefined location is other than File System and you are logging on to a DMS, a pop-up message will prompt you to enter your credentials.