Configuring Apache Web Server for Tomcat Instances
Perform the following steps to configure Apache web server for each Tomcat instance.
- Start the command prompt and enter the following line: SC delete <service-name>
-
Open a text editor and add the following lines:
"D:\tom_home\Tomcat 7.0A\bin\tomcat7.exe" //IS//Tomcat7A --DisplayName "Apache Tomcat 7.0A" --Description "Apache Tomcat 7.0.32 Server - http://tomcat.apache.org/" --LogPath "D:\tom_home\Tomcat 7.0A\logs" --Install "D:\tom_home\Tomcat 7.0A\bin\tomcat7.exe" --Jvm " D:\tom_java\jre7\bin\server\jvm.dll" --StartPath "D:\tom_home\Tomcat 7.0A" --StopPath "D:\tom_home\Tomcat 7.0A" "D:\tom_home\Tomcat 7.0A\bin\tomcat7.exe" //US//Tomcat7A --Startup auto "D:\tom_home\Tomcat 7.0A\bin\tomcat7.exe" //US//Tomcat7A --Classpath "D:\tom_home\Tomcat 7.0A\bin\bootstrap.jar" --StartClass org.apache.catalina.startup.Bootstrap - -StopClass org.apache.catalina.startup.Bootstrap --StartParams start --StopParams stop -- StartMode jvm --StopMode jvm "D:\tom_home\Tomcat 7.0A\bin\tomcat7.exe" //US//Tomcat7A --JvmOptions "- Dcatalina.home=D:\tom_home\Tomcat 7.0A#-Dcatalina.base=D:\tom_home\Tomcat 7.0A#- Djava.endorsed.dirs=D:\tom_home\Tomcat 7.0A\endorsed#- Djava.io.tmpdir=D:\tom_home\Tomcat 7.0A\temp#- Djava.util.logging.manager=org.apache.juli.ClassLoaderLogManager#- Djava.util.logging.config.file=D:\tom_home\Tomcat 7.0A\conf\logging.properties" "D:\tom_home\Tomcat 7.0A\bin\tomcat7.exe" //US//Tomcat7A --StdOutput auto --StdError auto" - Replace Tomcat7A with the Tomcat instance name you have provided.
-
Save the file with the Tomcat instance name and with the file extension
.bat.
If your Tomcat instance name is Tomcat A, save the file as TomcatA.bat.
- Create similar .bat files for all Tomcat instances modifying the Tomcat instance name wherever necessary.
- Open the Httpd.conf file using a Notepad or a text editor.
-
Uncomment the following lines by removing # found at the beginning of the line:
LoadModule proxy_module modules/mod_proxy.so LoadModule proxy_ajp_modulemodules/mod_proxy_ajp.so LoadModule proxy_balancer_modulemodules/mod_proxy_balancer.so LoadModule proxy_connect_modulemodules/mod_proxy_connect.so LoadModule proxy_ftp_modulemodules/mod_proxy_ftp.so LoadModule proxy_http_modulemodules/mod_proxy_http.so Include conf/extra/httpd-vhosts.conf - Save and close the file.
- Open the httpd-vhosts.conf file using a Notepad or a text editor.
-
Edit the file providing appropriate values as necessary, including the Tomcat version you are using. Refer to the following image:
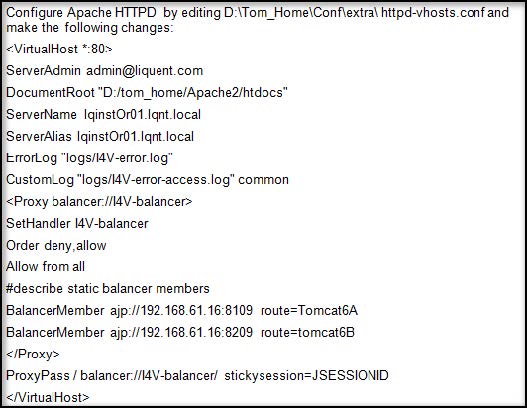
- Save and close the file.
-
Create the folder I4V in the Tomcat instances path.
C:\Tom_App\I4V
- Copy the webapps folder (typically found at C:\tom_home\Tomcat 7.0A\webapps, where Tomcat 7.0A is the example of the Tomcat instance folder) to the I4V folder created in the step above.
- Copy the I4V.war file to the webapps folder.
- Open the Server.xml file, typically found in the location: C:\tom_home\Tomcat 7.0A\conf\Server.xml (Tomcat 7.0A is the example of the Tomcat instance folder).
-
Change the port numbers for the various Tomcat instances.
<Server port=”8005” shutdown=”SHUTDOWN”> (8105, 8205, 8305) <Connector port=”8080” protocol=”HTTP/1.1”> (8081, 8082, 8083) <Connector port=”8009” protocol=”AJP/1.3” redirectPort=”8443” /> (8109, 8209, 8309) -
Provide the name of the Tomcat instance for the attribute jvmRoute as shown:
<Engine name="Catalina" defaultHost="localhost" jvmRoute="TomcatA">
-
For each Tomcat instance you have, added the following lines as below and provide the Tomcat instance name value for the jvmRoute attribute:
<Engine name="Catalina" defaultHost="localhost" jvmRoute="TomcatA"> <Engine name="Catalina" defaultHost="localhost" jvmRoute="TomcatB"> <Engine name="Catalina" defaultHost="localhost" jvmRoute="TomcatC"> <Engine name="Catalina" defaultHost="localhost" jvmRoute="TomcatD"> -
Uncomment the following clustering tag by removing the preceeding .
<Cluster className="org.apache.catalina.ha.tcp.SimpleTcpCluster"/> -
Point to the common WEBAPPS folder by updating as shown:
<Host name="localhost" appBase="D:\tom_app\I4V\webapps"> - Save and close the file.
- Restart the Tomcat instances.
- Replace the licence.xml file found under the /web-apps/I4V/WEB-INF/config folder with the license.xml file provided with the installation package.
- Open the web.xml, typically found in the location: C:\Tom_App\I4V\webapps\I4V\WEB-INF\, using Notepad or a text editor.
-
Add the following lines:
</welcome-file-list> <distributable/> </web-app> - Save and close the file.