
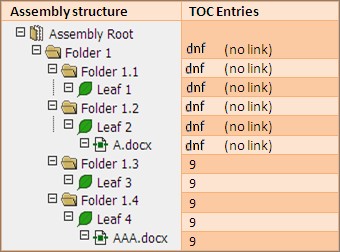
Sample TOC 3
— All elements are in-channel and included in page numbering.
— Document A.docx is not ready to publish with a planned page count of 8.
— Document AAA.docx is ready to publish.
TOC Entries that Target Native Leafs and Descendents
A native leaf is a leaf with the Use Native File attribute set to YES. Because the output file of native leafs may be of any file type, Native leafs require special handling.
The following rules apply for native files:
— The page number for the first page is used for any page in a native leaf document. Page numbers and totals are always calculated using the Planned Number of Pages for native leaf documents. If you have not indicated a Planned Number of Pages for a native leaf document, one page will be used. Native leaf documents follow the usual rules of page numbering. If you do not want native leaf pages to be added to the page numbers and totals, set Include in page numbering to NO. If you do not want the native leaf document to affect the paper channel page numbers, remove it from the paper output channel.
— The PDF link for a link, TOC entry, or bookmark in published PDF output that targets a page in a native leaf appears as a Launch link. The targeted native leaf file is opened in its associated application. Because of this, individual pages in the native leaf file cannot be targeted. If Adobe Acrobat® is the default application for PDF files, links targeting pages in native leaf output will navigate to the first page.
Invalid Targeted Assembly Elements
Invalid targeted assembly elements are usually created in error, and are not included in the published assembly. Invalid targeted assembly elements can be caused for several reasons.
Possible reasons for invalid target assembly elements:
— Out-of-channel TOCs and documents (and their extracted bookmarks).
— Extracted bookmarks of documents with new bindings. This situation can occur by creating a TOC tree with extracts, followed by performing a DMS synchronization on the parent document without updating/regenerating/ rendering the TOC.
— Extracted bookmarks out of page range. This situation can occur by creating a TOC tree with extracts, and then limiting the page range of the document to exclude some extracts without updating/regenerating/rendering the
TOC.
— Target elements that have been deleted from the assembly. This situation can occur by creating a TOC tree, and then deleting some of the target elements without updating/regenerating/rendering the TOC.
When a TOC contains entries targeting invalid elements, the right column text for these TOC entries is the Destination Not Found Text. There is no navigable link for these TOC entries.
Tables of Contents
Tables of Contents (TOCs) enable you to find contextual information in a published assembly. The creation of TOCs is dependent on document structure, as each submission document can contain several levels of document structure elements in a familiar hierarchy. For CTD TOCs, the hierarchical structure roughly follows the eCTD hierarchy, but for other publications such as study reports, the structure may differ.
You can treat TOCs as additional assigned documents in the repository that are not part of the lifecycle or content, but are needed during electronic and paper publishing. These TOC documents can be generated into .docx format for use and modification in Microsoft Word or other word processing applications. Normal rendering processes can create final TOC documents in the publishing output file format.
When you insert a TOC into an assembly the default TOC type is used automatically, or you can choose an alternate TOC type. You specify the default TOC settings in the Publishing Settings Library Templates, and a default TOC is required. In the publishing settings, you may create an association between different TOC types and assembly elements or locations. This association is called mapping.
When publishing tables of contents that include a range to which all content has not yet been assigned, TOC entries that cannot be targeted. For example, when no content yet exists under the leaf, TOC entries are stamped with the Destination Not Found Text from the Publishing Settings. Once the content is assigned to the leaf, the TOC entry stamp correctly resolves to the destination.
If you are defining (mapping) a TOC for volumes, when you insert a TOC on a volume the TOC type associated (mapped) with a volume may be inserted automatically. As long as the TOC types are defined correctly for the appropriate elements before bulk insertion, little editing of the assembly is necessary to generate valid TOCs.
When you generate a TOC, a Word document is created from the information about the TOC in Ennov InSight . The TOC is combined with the style and format specified in the TOC template. The TOC is then rendered to a PDF and the right-column text and hyperlink is resolved during final publishing. There are various ways to create a TOC, for example:
— Generate the TOC from the default range directly to a PDF during final publish; this is best suited for volume
TOCs.
— Edit the TOC in the TOC editor, then generate the TOC from the TOC editor directly to a PDF during the final publishing.
— Generate the TOC from the default range to the Word document preview, edit the preview, then publish the Word document to a PDF during final publishing; this is best suited to submission TOCs.
— Edit the TOC in the TOC editor, generate the TOC from the TOC editor to a Word document preview, edit the preview, and then publish the Word document to a PDF during final publishing; this is best suited to a submission TOC.
Generated TOCs are saved to the preview location specified in the TOC publishing settings.
When you preview a generated TOC, the system makes a copy of the TOC in a temporary location (regardless of the defined preview location) and displays that copy for preview. Any changes you make to the previewed TOC are made on the temporary copy only, and are not made on the actual TOC that will be published.
Note: In some desktop configurations you may have to save the TOC to a local file and open the local file to view the TOC.
Insert a TOC
You can insert a TOC in an element for the contents of the element.
When adding a TOC to a tree element, the TOC name inherits the name of the element on which it was placed. This name is used to create the file name of the generated TOC.
Note: If a TOC is placed on an element that includes a special character in its name (/ \ : * ? < > |), you must edit and update the TOC name so that it does not include special characters, otherwise it will not generate.
To insert a TOC:
- In the assembly, right-click the element where you want to insert the TOC and choose Mass Insert/Update Publishing Elements.
- In the Mass Insert/Update Elements window, select Table of Contents.
- Select one or more elements where you want to insert a TOC:
Option Description For this Element: Inserts a TOC for the selected assembly element. Volumes: Inserts a TOC for each volume in the assembly. Folders: Inserts a TOC for each folder in the assembly. Leaf Elements: Inserts a TOC for each leaf element in the assembly. Documents: Inserts a TOC for each assigned document and document placeholder in the assembly. Page Markers: Inserts a TOC for each volume break in assigned documents. - In the Publishing Setting list, leave the Use Default setting, or choose an alternative TOC setting (if other TOC settings have been created in the PLT).
- To set the Range Start option, select Entity and click Browse to specify the location in the Current Assembly to start the range of the new TOC.
- Click Insert.
A message prompts you to confirm the insertion.
- Click OK.
For each element where a TOC has been inserted, the TOC icon appears in the assembly tree.
Modify TOC Attributes
You can modify the attributes of a TOC placed in an assembly.
To modify TOC attributes:
- Click Edit Publishing Settings Library to open the Publishing Settings Library for the assembly.
- In the Publishing Settings Library, click TOC.
- On the TOC tab, click the name of the TOC you want to modify.
- On the TOC Types page, click Edit TOC Type.
- On the Edit TOC Type page, modify the TOC attributes as needed.
- Save. To close the Edit TOC Type page without saving any changes, click Cancel.
Modify a TOC
Use the TOC editor to modify folders, leafs, or files in a TOC by: deactivating or activating them, editing their names, moving them up or down, and promoting or demoting them in the hierarchy. You cannot modify the root of the assembly in the TOC editor.
To modify a TOC:
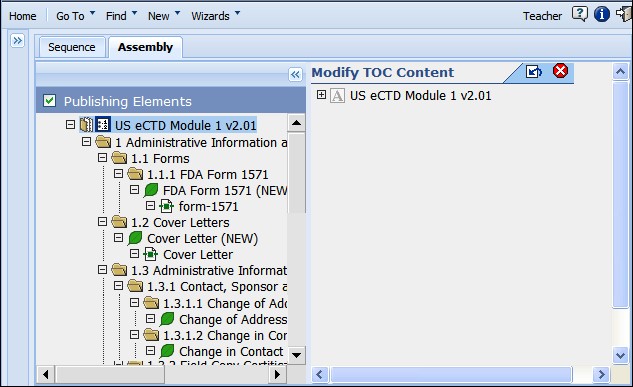
- In the Publishing Elements view of an assembly tree, click TOC. The TOC Attributes window appears.
- In the TOC Attributes toolbar, click Modify TOC Content.
The Modify TOC Content view displays the entries of the selected TOC.
Note: Using Modify TOC Content (the TOC entries editor) sets the TOC Content Modified flag to Yes on the TOC Attributes page. This gives you control of the TOC Content for making modifications. If you only want to view the TOC Content and do not want to make modifications, click Reset TOC Content to exit.
- To modify an entry in the TOC, right-click on the entry and
choose an option in the list. Multiple entries can be selected to
perform an action.
The option list is contextual, depending on the location of the selected item in the TOC. Only the usable options will be available for the selected TOC entry.
- To reset the TOC so that it includes all of your recent
assembly changes, click Reset TOC Content.
Using Reset TOC Content sets the TOC Content Modified flag to No on the TOC Attributes page. By clicking this button, you relinquish control of the TOC Content. Any changes you have made to the TOC Content will not be saved.
- To save your changes, take control of the TOC Content and close the Modify TOC Content view, go back to the TOC Attributes view, and click Close.
Select Contiguous TOC Nodes
You can select multiple TOC entries, or nodes, either contiguously or non-contiguously.
To select contiguous TOC nodes:
1. Click the first TOC entry of the group of nodes you want to select.
Press and hold the Shift key on your keyboard.
3. Click the last TOC entry of the group of nodes you want to select.
All of the nodes in your selected group should appear highlighted. You can now perform the following actions on the entire selected group at once:
— Activate
— Deactivate
— Drag-and-drop
Select Non-contiguous TOC Nodes
You can select multiple TOC entries, or nodes, either contiguously or non-contiguously.
To select non-contiguous TOC nodes:
- Press and hold the Ctrl key on your keyboard.
- Click the TOC entries you want to select.
The nodes that you selected should appear highlighted, although the group is not contiguous. All of the nodes in your selected group should appear highlighted. You can now perform the following actions on the entire selected group at once:
— Activate
— Deactivate
— Drag-and-drop
TOC Context Menu Options
Use the TOC context menu options to manage elements in a table of contents.
| Option | Description |
| Expand Range | Expand the selected entry to reveal its child entries. |
| Deactivate/Activate selected | Deactivate or activate the selected entry. |
| Deactivate/Activate selected + descendants | Deactivate or activate the selected entry plus its child nodes of the same active/inactive state. |
| Edit | Change the name of the selected entry. |
| Move Up | Move the selected entry up (within its node group). |
| Move Down | Move the selected entry down (within its node group). |
| Promote | Move the selected entry (and its child entries) to the left in the TOC. |
| Demote | Move the selected entry (and its child entries) to the right in the TOC. |
Deactivate a TOC Entry
You can deactivate a TOC entry if is not needed in the submission.
To deactivate a TOC entry:
1. In the assembly, select a TOC and click Modify TOC Tree.
Right-click the TOC entry, and choose Deactivate.
The TOC entry is not deleted, but it is made unavailable.
- Save.
- To activate a deactivated TOC entry, right-click it and choose Activate, then Save.
Modify TOC Entry Text
Use Edit TOC Entry to modify the text of an entry in the TOC tree.
To modify TOC entry text:
- In the Publishing Elements view, click TOC.
- On the TOC Attributes page, click Modify TOC Content.
- Right-click a TOC level, and click Edit.
The Edit TOC Entry dialog box appears.
- Edit the text and Save.
The TOC entry content is updated.
View TOC Entry Text
You can view the text for a TOC entry to verify it.
To view TOC entry text:
1. In the assembly, select a TOC and click Modify TOC Content to view the Modify TOC Content page.
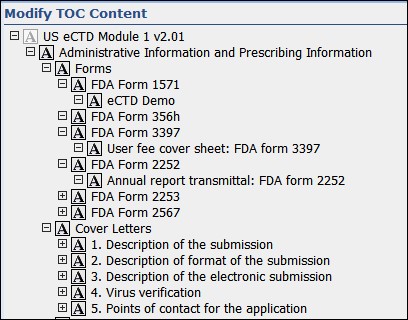
Example
To expand the TOC content of any node with children (other than the root TOC content node) click Expand or right-click and select Expand Range. To collapse the TOC content of a node with children, click Collapse.
Example
Duplicate a TOC
You can duplicate a TOC within an entity and add it to the assembly.
To duplicate a TOC:
- Right-click the TOC you want to duplicate, and choose Duplicate TOC. The new TOC is added to the element and the Edit TOC page appears.
- In the Edit TOC view, specify the values to use and Save.
The duplicated TOC is added to the assembly tree.
Delete a TOC
You can delete a TOC from an entity as needed.
To delete a TOC:
- Right-click the TOC you want to delete, and choose Delete TOC.
A message prompts you to confirm the deletion.
- Click OK.
Note: If you delete the Microsoft Word TOC document created by Ennov InSight directly in the DMS repository or secure file system, the publish may fail because Ennov InSight cannot rerender the Word TOC documents into PDF output. You must delete the TOC element and create a new one.
Move TOCs
You can drag a TOC to an unlocked tree element in an assembly.
If the TOC Content Modify flag is not selected, the TOC range also moves to the new location. If the TOC Content Modify flag is selected, the TOC range does not move and your edits are preserved.
You can drag items to any element in the assembly tree, or to a volume, but you cannot drag items from a volume into an assembly tree.
Move a TOC
You can move a TOC to another place in the assembly.
Click the TOC that you want to move and drag it to an unlocked tree element. The TOC is moved.
Generate a TOC Manually
Use this procedure to generate a TOC manually.
To generate a TOC manually:
- In the assembly, click the icon for the TOC you want to generate.
- Click Generate.
A job request is submitted to generate the TOC.
- Choose Go To > Job Requests to monitor the progress of the request.
When the job status is complete, you can preview the TOC.
Generate a TOC Using Prepare to Publish
Use this procedure to generate a TOC using Prepare to Publish.
To generate a TOC using Prepare to Publish:
- From the assembly, select the entire assembly or the section for which you want to generate a TOC.
- Choose Prepare to Publish from the action toolbar. The Prepare to Publish dialog box appears.
- Select Generate TOCs only, and clear any other options that are selected.
- Click OK.
- message prompts you to confirm the publish.
- Click OK.
- job request is submitted to generate the TOCs.
- Choose Go To > Job Requests to monitor the progress of the request.
- When the job status is complete, click View File.
Preview TOC
You can preview a local, cached copy of a generated TOC in your Web browser.
A TOC must be generated before it can be previewed. Use the Generate TOCs option in the Prepare to Publish dialog to generate a TOC for preview.
When you preview a generated TOC, the system makes a copy of the TOC in a temporary location (regardless of the defined preview location) and displays that copy for preview. Any changes you make to the previewed TOC are made on the temporary copy only, and are not made on the actual TOC that will be published.
Preview a TOC
You can preview a local, cached copy of a generated TOC in your Web browser.
To preview a TOC:
- When a job request to generate a TOC has completed, on the
assembly page, click View File to preview the
TOC.
- When you are prompted, open the TOC.